background

Thursday, July 23, 2009

Becco replica


Recently I took a little trip to New York for the JFR Lerner Fellowship. There were some fabulous meals and snacks to be had in an entire new part of the city that I had not explored (the Upper West side around Columbia). One of the restaurants that we ate at was called Becco. It is located just off of Broadway in the Theater District.


The outside of Beco

All in all the food was very good a Becco. We were a large group so we had a preset menu, but at one point I looked at the rest of the restaurant and it looked as though the entire restaurant may be preset. One thing that automatically made the meal wonderful was excellent conversation with the Croatian teachers that came to the fellowship whom we tried enthusiastically to teach how to be Southern/Texan. I was a bit envious of the friend next to me who ordered a glass (or two) of Prosseco. I really enjoy the Italian sparkling wine and it would have matched well with the variety of food we had. I do not remember much about the anti pasta we were given. It was marinated artichokes and red bell peppers and marscapone cheese with some sweet glaze that I felt would be better suited for dessert. The salad was mixed greens in a typical house dressing even though we were supposed to have Caesar until too many people complained about anchovies in the dressing not realizing that most Caesar dressings have anchovies. On to the unlimited (yes I said unlimited) servings of pasta. There were three types and I do not remember much about one of them. The other two were mushroom ravioli and oreichette with cauliflower. The ravioli was good and had a very nice sauce that complimented the dish well, but for me the real winner was the oreichette with cauliflower. All of the pasta was homemade and some of the shell shaped pasta had a tendency to stack together making a larger pasta filled bite (which I loved). The cauliflower was a little soft, but had good flavor when tossed with a really light and smooth tomato sauce. Topping all of this off with a good dose of Parmesan really made the dish come together. I rather enjoy the way that Parmesan acts as a last minute "binder" for lighter pasta sauces. I came home and duplicated what I ate!

We try to eat a lot of veggies and this was a new way to prepare them. I took zucchini, yellow squash, and carrots and using my vegetable peeler cut slivers of veggies. This was all sauteed with finely sliced red onion, garlic, olive oil, and a bit of fresh ground black pepper! Really good and fresh tasting.

I boiled the pasta (I used rigatoni at Matt's request) and used the steamer basket to steam chopped cauliflower. I took the cauliflower after it was "al dente" and sauteed in a little olive oil and garlic.


All real pasta dishes need lots of fresh basil. We roughly chopped this and tossed it when we were mixing all of the pasta together. The basil will wilt just enough from the residual heat of the pasta and sauce. We have found that it tastes a lot fresher and makes the basil much more noticeable when not cooked in the sauce.

For the actual sauce I took a shallot and half a red onion diced and sauteed that with a couple cloves of chopped garlic. When everything was translucent I added one large can of diced tomatoes, seasoned with salt, pepper, garlic powder, and a bit of Italian seasoning. After letting it mellow and blend a bit, I tasted and adjusted my seasoning. We like sauces like this sometimes because it is super fresh and almost raw in that it is not your all day simmered marinara or meat sauce. It is great for the summer time!


We tossed it all together with Parmesan and topped with sauteed chicken (this is when you add the fresh basil)!

A word about your chicken. Mattie and I sometimes buy vinegar based salad dressings that we end up less than thrilled about. When this happens, we keep it in the fridge and use it for a quick marinade on our chicken. Just because you don't like it on your salad doesn't mean that it won't impart wonderful flavor on your poultry!

Tuesday, July 21, 2009

Pasta E Fagioli


One of my favorite modified recipes is my recipe for Pasta E Fagioli. Pasta E Fagioli is pasta with beans and is often served in soup form. If you order this at Olive Garden you will get a soup tasting very much like chili. It is good, but a little less authentic than the recipe I modify. For the soup: In olive oil sautee one diced onion and two to three diced carrots. If red, yellow, or orange bell peppers are on sale I throw a finely diced bit of that in too. When the veggies are well on their way to being tender you can toss in some chopped garlic. I then drain three or four cans of Cannolini beans and rinse those to remove some of the salt and starchiness. I usually let those soak in some of the veggie-ness for a bit in the pot as well. This next step is up to you: you can add in a bit of tomato paste or canned diced tomatoes. I would not add a lot, just enough to add a bit of flavor. Top everything off with water or chicken stock. At this point I usually season with salt, pepper, garlic powder, fresh rosemary and some Italian seasoning. Sometimes I also add a bay leaf or two (it is soup after all). Once the soup is to a full boil add ditalini or some other small shaped pasta. Once the pasta is cooked you are ready to stir and serve.

You MUST top this with a drizzle of good quality olive oil and parmesan cheese. Optional is browned Italian sausage (removed from the casing). With Mattie the carnivore, I must add the sausage!

Serve with salad and toasted bread or combine the two and serve with bruschetta!

Wednesday, July 15, 2009

Ole for Burritos


This is a method I learned from my dad. We would eat this fairly regularly and seeing as it is so easy and delicious, Mattie and I have it probably once a month or so. The concept is simple...you take a frozen burrito and spice it up to your liking. We always choose to bake our frozen burrito in the oven, but from what I understand the frying method is even better. While the burritos are baking and getting toasty we heat up refried beans and canned (or homemade) chili. We also shave some lettuce, dice tomatoes, avocado, and onions and grate some cheese. When the burritos are ready we put down a layer of beans, a layer of lettuce, the actual burrito, spoon a generous serving of chili on top, cover in cheese, avocados, and tomatoes and get ready to enjoy. My favorite part about this dish is that after the burrito is done, you usually have a little miniature taco salad left on your plate from all of the toppings and burrito guts. We have a neighbor who took this same basic concept and put all of the hot stuff (beans, chili, burritos, and cheese) in a casserole dish for easy transportation. This is a very simple meal, but sure to please and if people can find frozen burritos in other parts of the country or world, a nice way to remind them (fairly closely) of some good texas flavor!!!

Monday, July 6, 2009

Summer time means fruit galore!

Just a quick post to write about the glories of summer time fruit! We love this time of year when HEB and Kroger vie over customers with ridiculous weekly specials on otherwise expensive fruit. We find ourselves perusing the grocery store ads to see who has Strawberries for less than $1 or cherries for a cheap amount per pound. The plethora of fresh fruit means that Mattie and I tend to stay away from traditional dessert and opt for fresh fruit with a bit of sugar, cut up over our favorite light ice cream (Dreyers Slow Churned Vanilla Bean...you cannot tell it is lower in fat...I swear), or as a topping to angel food cake. It is a dessert or snack that you can feel really good about. We rather enjoy sweet strawberries that can be eaten as we cut them up in preparation for a dessert later in the day. We also like blackberries and raspberries that merely need to be washed and popped in your mouth for that burst of flavor. When we can get some good peaches or nectarines I will break out the ice cream maker for a nectarine/peach and raspberry sorbet. Lastly, we like to add cut up berries and granola to yogurt for a snack or breakfast (my favorite combo is a blackberry, cinnamon granola, apple turnover yogurt concoction). The picture was a fruit salad that Matt commissioned after he bought kiwi, strawberries, nectarines, blueberries, blackberries, and raspberries, it was a delicious and light end to a wonderful meal.

Friday, June 19, 2009

Yummy, Fluffy, Buttermilk Biscuits


I have a deep fondness for buttermilk biscuits. One of my earliest cooking memories is sitting with my father on top of our counters sifting the flour for our breakfast biscuits on any given Sunday morning. I loved to watch the flour "snow" into the bowl or wax paper and I loved spending the time with my father. He still comments about me being so little that I could scoot all the way under our cabinets and sit with my back against the back splash. As my father learned how to make a softer and softer biscuit, so did I. I learned from all that my father did and now replicate THE biscuit recipe often. Sometimes I want a biscuit from Popeye's or KFC...buttery, tender, flaky...my biscuits are not like this. My biscuits might be considered a little more "gourmet" and they are definitely softer. If you do not follow this method you will not have the softest possible biscuits. The choice is yours and yours alone!

Ingredients:
1/2 to 3/4 teaspoon baking soda (I lean towards the 3/4 side)
2 cups bread flour (not All-purpose, not self-rising...definitely not cake)
1 tablespoon of baking powder
1 teaspoon of salt (I often measure just shy of a teaspoon)
1/3 cup oil (not olive)
2/3 cup buttermilk

Measure milk and oil in the same cup, but do not mix together. Set aside. Sift your dry ingredients together...twice...do not skip this part. Matt's mom thought that sifting was for mixing dry ingredients, but that is not the case. The purpose of sifting is for aerating the ingredients thus creating a lighter and fluffier product. Pour the milk and oil all at once into the dry ingredients. Stir until just combined to make a soft dough. Sometimes I need to add a touch more buttermilk, you should know if you need more buttermilk by the third or fourth stir. I tend to stir less and have a bit of extra flour at the bottom of the bowl. This ensures a softer biscuit because I have not worked the bread dough. If you overwork the bread dough you will start to develop the gluten...this makes chewy bread...which is great for baguettes...not for biscuits.

As you can see in the picture above I am delicately forming the biscuits in my hand, usually with the help of a fork. I don't usually roll and cut my biscuits (goes back to the whole gluten thing). I take a biscuit sized glob with the fork, make sure it holds together, and place it on a greased pan. I then cook the biscuits (this recipe yields about 8 biscuits) in a 475 degree oven for 10 to 12 minutes. Begin checking these suckers at 10 minutes or so...you want a nice golden brown color.

Now serve with eggs, sausage, gravy, jelly, whatever! These are not biscuits you can make into a sandwich...they will fall apart. I really like a good cream gravy with sausage bits in it, but do not make it that often. I prefer more "traditional" jellies like peach/apricot (they don't taste that different in jelly form) or strawberry, and sometimes some really good honey while Mattie likes "crazy" jellies like cherry, blackberry, and raspberry. Enjoy one morning! I am looking forward to one day making these biscuits with my own little one.

Aside...as far as sifters go I am a fan of the old "crank" style sifter, rather than the trigger/spring style sifter. It is less effort on your hand and seems much less pretentious when making something as homey as biscuits!

Sunday, June 14, 2009

Taco meat por favor!

Matt and I frequently partake in making mexican food of all sorts. We recently decided to make beef taco meat. We actually ended up with a half beef/half ground venison mixture because the venison is free and adds nice flavor and texture. First chop half of a large yellow onion for each pound of ground meat that you have (I say half of a large rather than a medium because I have not seen any medium size yellow onions for some time in my grocery store). Also chop a small green bell pepper for each pound of ground meat. Once that has sauteed/sweated (very little color on the veggies) in vegetable (actually corn or canola) oil, add your ground meat. Before anything more than the very bottom layer that is actually touching the pan gets cooked add A LOT of garlic powder, salt, pepper, cumin, and a bit of oregano. The cumin is the main ingredient. As you can see below there are a lot of spices in this pot for two pounds of meat. I stir this concoction around then let it sit, covered, on medium low heat until the meat is cooked. It should have rendered out some good juices, but if it has not add a bit of water to the pan. At this point I taste the meat and usually add more cumin and more pepper. Remember, it is easier to add more spice than it is to take away too much spice in a dish! I try to let this simmer for at least an hour, but it is always better the next day.


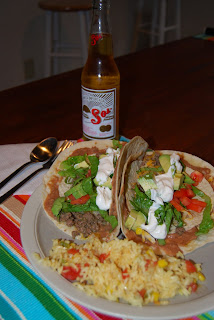
These are Matt's perfectly formed tacos. He requested flour tortillas that were bound to the crispy shell by a layer of refried beans so I obliged by having all that was necessary. We had the beef taco meat, beans, avocado, lettuce, tomato, cheese, and sour cream (which I have had an increasing fondness for in my pregnancy). He also indulged in a good Mexican beer with lime!

We also really enjoy making Mexican Rice. For this saute a small amount of onion and bell pepper (this would be really good with red, yellow, or orange bell peppers too). When they have gotten soft, add a bit of oil to the pan and saute the rice so that it can soak in some oil and get a little toasty. When it appears translucent, add your liquid...we usually use some Rotel style tomato juice, water, and chicken stock. Let that cook down, stirring occasionally to avoid stick-age. When the rice is almost done add corn, cilantro, and some of the Rotel tomatoes (get the mild unless you like it really hot, if you don't want it hot at all then go for canned diced tomatoes). Season to taste with a bit of salt or garlic powder.

The next day we put a twist on one of our favorite dinners which is mega salad. For mega salad we imagine that we are at Sweet Tomato or Souper Salad making one of their salads. For this one, due to the taco meat, we put a latin flair on it. Romaine lettuce, tomatoes, black olives, fresh corn, drained and rinsed black beans, avocado, and bell pepper were all tossed with shredded cheddar cheese, warm taco meat, and tortilla chips. For a dressing, I threw in some sour cream and salsa and tossed to coat all the veggies. It was yummy!...and delicious!!!


Wednesday, June 10, 2009

Et tu anchovy???


Ever since high school I have had a deep fondness for Caesar salad. My sister developed her fondness, nay obsession, with the salad much earlier than that. There was a trip our family took to Colorado that she ate Caesar salad and/or Chicken Fettuccine Alfredo every day we were there. My fondness for Caesar salad is different though. As you can see in the picture above the greens are not your typical creamy coated lettuce salad. My father taught me this method after watching a waiter make table side Caesar salad at a restaurant. Because my family had a bought with Salmonella once before we skip the raw egg portion of our dressing and we up the vinegar. In all fairness, I try to top the salad with boiled egg (plus Mattie likes that it means extra protein for him). I cannot give you exact measurements for the dressing, but I will try to translate the method and approximate amounts as much as possible.

First, wash and dry your romaine lettuce leaves...this (and many other dressings) will not stick to wet lettuce. If you don't have a salad spinner, now might be a great time to get one. I would also recommend that you have your croutons and shredded Parmesan ready to go. This would also be a great time to put some salad plates in the freezer if so desired.

Next, in a large bowl (I have a good, shallow metal bowl that I usually use), crush two or so cloves of garlic. Add a few sliced anchovies and mash this together until it is a thick paste. I use the back of a fork to get optimum anchovy mash-age, but sometimes you need to break it up further with a sharp knife.

Next, add a few splashes of several different vinegars. We always use a good balsamic vinegar and some red wine vinegar. If it is a special occasion we break out the Mexican vinegar that we cannot find any more and add a splash or two of that. Also squeeze half a fresh lemon into the dressing. Mix all of this together. It should be fairly thick from your anchovy/garlic paste. If you want you can throw in a dash or two of Worcestershire sauce (to make it more authentic).

Next get out a small whisk. While beating slowly, stream in a good quality Extra virgin olive oil. You need a good quality olive oil (and extra virgin at that) because this is a dressing...you need the best flavor possible. The amount of olive oil is completely up to you. Matt's family can attest that I like a very tart dressing that definitely does not have much more olive oil than needed. Taste a bit and add if needed...it is easy to add more...impossible to take away.

Now add in your lettuce, Parmesan, croutons, and lots of freshly ground black pepper and toss together. I like to let this sit for a minute so the croutons can soak up any extra dressing. We often top with boiled eggs as mentioned before and if we are having this as a dinner we add chicken and sometimes fresh avocado.